Showing posts with label Dry Embossing. Show all posts

Wednesday, 1 January 2014

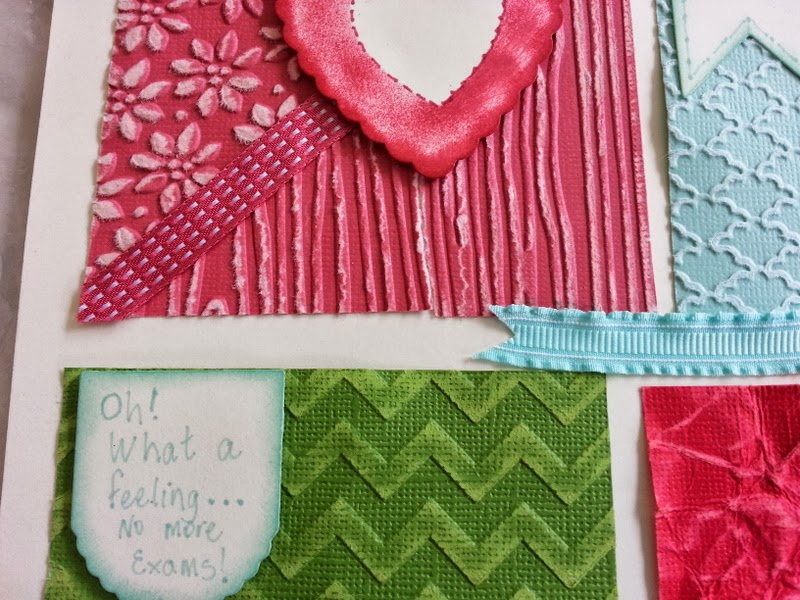
UP Close of the Textured Sampler Scrap Page - detailed sections of a previous post.

In this photo you can see the details of two *TIEFs  - the top left hand is "Petals-a-Plenty" and the bottom corner of the same square is "Woodgrain"; I cut the square in half diagonally and used the TIEFs then sanded the textured side which was raised. This was tricky to do, I had to remember to have the Textured side UP  as I placed the piece of card into the Folder which had the RAISED section of the folder UP as well. This ensured the raised pattern pushed up through the card and then I could sand off the top colour with Stampin' Sanding System.
[*TIEF = Textured Impressions Embossing Folder]

 This square [above], shows the "Chevron" TIEF impressed onto Gumball Green Core'dinations Paper. the Piece of RED has been squished then sanded, when I was squishing the piece, the layers started to separate so I pulled them apart carefully.

The photo to the RIGHT shows what I did with the piece off the Back, which was the smooth side; I used the Typeset Alphabet Bigz "&" - I folded the piece in half with the smooth sides together, and then moved the bottom piece to the right to create a "shadow" effect.  I thought it needed a little something so I created a "sewing" look by drawing the stitches in the center.

Thanks for taking a peek. I hope I have transferred some creativity to you. Check out the Annual Catalogue on page 157 for the original idea. Stampin' Up! have some great ideas that I'm beginning to take advantage of, and that's the whole idea of having the ideas in their Catalogue. Enjoy your creativity.
Friday, 18 January 2013

First Class for 2013

We are off to a great start, at my first class for the year, we made these two cards, which I love and had fun creating.  
Images Copyright Stampin' Up!


This card is CASEd  from Kari Metzger via Glenda Mollet, thank you ladies for your inspiration. 

I had trouble using the brayer on plain Whisper white card so I used Gloss card, and found it was much more forgiving and easier to use.

First brayer the  Gloss card with Bashful Blue, then ink up with Marina Mist and brayer one end-for the sky. ONLY go to half way or even just before half way; then ink up brayer with Pear Pizzazz and repeat this process on the other end for the grass;  the ink needs to blend and have a misty appearance in the center of the card.

The leaves are interesting; cut a long shape by folding a 2 cm strip of Pear Pizzazz in half [length is important you don't want a short fat leaf], now cut the shape; holding the folded side, start cutting from the bottom [wider part, for the base] and cutting out to the edges making sure the shape is becoming a rounded tapered shape to the point of the leaf, once you have done this, run  through the crimper, unfold and 'voila' you have a leaf shape with texture. 

The flowers are from Daffodil Delight and using the Bigz Die "Fun Flowers" medium and small sizes. You need to cut two of each size. Score the larger flower in the center of each petal, and score the smaller flower at the base of each petal, and remember to curl the petals to give them character. I made the stamens by cutting a piece of Daffodil Delight about 6 mm wide and 
15 mm long, cut strips from the one end, leaving a 2 mm edge on the opposite end, 5 cuts about 1 mm apart should do it. you will end up with a "fringe" effect. With fine point tweezers, hold one of the strips at the end with the 2 mm edge and turn the rest around the tweezers, secure with glue and place in center of flower, when dry splay out the "fringe" to get the effect seen below, or in the  photo above.

this photo [above], shows how the petals look with daubing around the edges looks much nicer...I forgot to do the daubing while we were making the card and realized when everyone went home...we could have daubed the leaves as well giving them added dimension. My excuse for my forgetfulness is - too long between classes - !!! 

Below is the second card we made, again using Daffodil Delight, and the Build a Blossom stamp set from Stampin'Up!  This is also a CASEd card, this time it's  from Splitcoast Stampers by 'Dbamesberg'   called "Spring Blossoms". 

Notice the detail outlining the petals, scalloped along to indicate there is a center of the flower where the pearls are, turning this into a 3D  image. Using the Stampin' Write marker same colour as ink, in this case Daffodil Delight pen was used, mark scallops around the top edge of the image to highlight the flower petals, and continue making scallops free hand, [not following any lines but using your imagination] marking the front of the petals. This is a clever technique, I wish I'd thought of it, alas I can only  share what I've seen.

There were two Textured Impression Embossing Folders used when creating  this card, 
the perfect polka dots folder and the flower garden folder.

This is a simple yet elegant card and I just love it. I've seen this made in blue tones, also very nice on the eyes.


Images Copyright Stampin' Up!


Wednesday, 1 August 2012

The Canvas - 'Denim, Lace and Tin'

This is the canvas that I made one afternoon while I was playing with my Big Shot.  I had an inspiring thought while chatting with a friend about life. We ended up talking about Denim with Tin.

I got the picture in my mind about a canvas with Tin, Denim & Lace as well, can't have Denim without Lace. Here is the completed project. I would have liked to use a lighter coloured Denim, unfortunately I only had this piece in my sewing cabinet; I could have cut bits from the children's jeans, ...  that's how they buy them these days, with cut-outs everywhere??? 

I used the Big Shot Bigz Dies, for flowers and leaves in tin and cloth then added Buttons, Brads & Rhinestones. It was such a fun project to do. O yes, I also used some Embossing folders for the Tin flowers. The flowers were meant to be in a half moon shape, mmmm I got a bit carried away, still, I'm happy with it.

Thanks for stopping by, 

Happy creativity
Colleen

Wednesday, 16 May 2012

Double Embossing

Can't believe it is Wednesday again. Here are two cards I made for a class on Double Embossing.
I used So Saffron and Marina Mist CS with a retired DSP-Botanical Gazette from a Past Mini catalogue. The Technique is simple, first, using Versamark, rub over the Embossing Folder, then place the DSP and run through the Big Shot. Add Gold Embossing Powder, heat and there you have it-Double Embossing! you will notice that the images are different, one was done on the positive side of the folder and the other on the negative side...the look is dependent on your personal preference.


Have fun experimenting, come back soon
cheers
Colleen