Showing posts with label Embossing Folder. Show all posts

Monday, 7 April 2014

Baby Brag Book

Here are some of the pages from the Mini Album I made for a niece and her daughter.

I used the Big shot Scalloped Square to cut all the pages including the covers which were a cardboard.


Some of the pages have pockets to put trinkets in or other special items,


The  borders around the pages leave space in the centers to journal the memories.
 I used stamps, that were suitable for a girl,   that's why the colour of the pages are mostly pink!


Textured Impression Embossing Folders came in handy to give texture on some of the pages.  

The framelits and embosslits were a great help as well, which gave a variety of extra bits and pieces to enhance the effect.
  I used daubers on every page, that was the most tedious task, but worth the effort. 

Daubing highlighted textures, and gave the edges that extra something; the pages looked pale when not daubed.

I didn't count the finished pages, though there should be enough for at least the first year of her life to be recorded in style and with love by her mum.
I made a box for the Album to go into and tied it off.

I guess the box could have been deeper so that when all the photos and memorabilia
have been recorded it would still fit, to be kept as a heirloom. 

As these albums go, really, they need to be used and have finger marks on them to show the appreciation of the life they record.

I really enjoyed creating this for you Maree, I trust you and your Girl will  treasure the story you write.
hugs
Colleen

Monday, 13 January 2014

Thank you Cards 2 of 4

I wanted to post on Friday, however we went on a Family day out to the tablelands. We arrived home late so I didn't get to the computer. Saturday I spent with my sisters, daughter and niece. We had a girls weekend away. Everything was going great until our plans went pear shape and so we had to compromise on the venue. 

This meant we didn't have as much time away as we first planned, but the good news is we had so much fun. Two of my sisters bought their foot spas,one sister bought her manicure bag, there were word games to play and  a video to watch on how to do face exercises to define our facial features.   We all went out to dinner with our feet feeling refreshed and our nails looking great.  I hope your weekend was great as well. 

Now, are you ready for the next lot of Thank you cards in this series?


The top Left hand card was created using the  mosaic    stamp set with crushed curry and midnight muse.  I've used the decorative  punch for the label in this card and the one on the top right. there is daubing around the edges. the one on the right is much softer and this is created by using a dauber that has NOT been inked, but has ink in it already, so the effect is much softer than the one on the left ... which has just been tapped into the ink pad and so the dauber sponge is full of ink. I would have daubed the label on the left first then when I'd finished that card use the same dauber without re-inking and daubed the label on the right.

I fussy cut out the butterfly and flowers on the top Right card, then layered them over a piece of white card that has been put in an embossing folder and run through the Big Shot Machine.

All four cards share the same colour scheme. 

The bottom left card has a piece of midnight muse card that has been punched with the scallop border punch on one edge, then layered on top of this are 3 strips of DSP. The images are from the ....stamp set. I used the modern label punch for this greeting.  

The last card, bottom right, has DSP   that has been cut and placed in opposite corners. It was a square, so when the pieces were placed into the opposite corners, there was a space left in between and this is where I stamped off the butterfly from the  ... stamp set. as you can see I used my pens to colour the image; starting with the lightest colour, and then the darker one. I also punched out a butterfly in the lower right corner.

till next time 
happy creating
Colleen

Wednesday, 1 January 2014

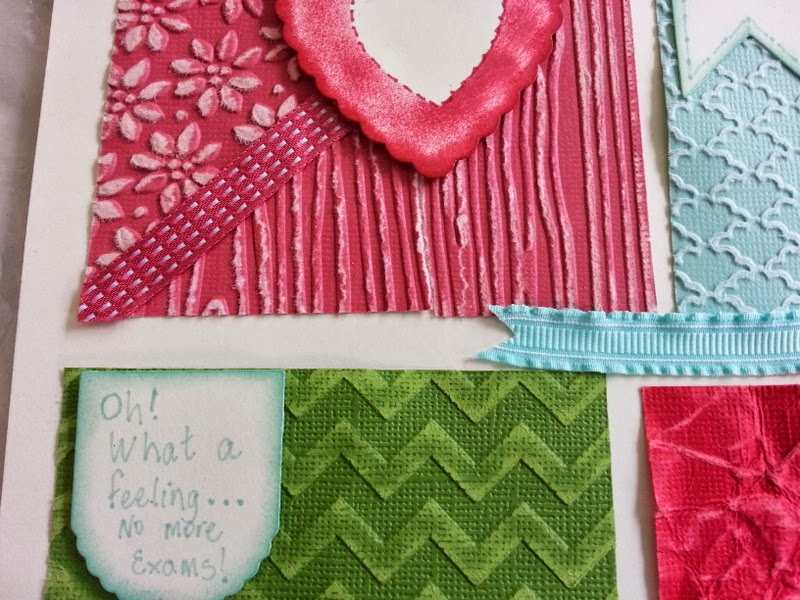
UP Close of the Textured Sampler Scrap Page - detailed sections of a previous post.

In this photo you can see the details of two *TIEFs  - the top left hand is "Petals-a-Plenty" and the bottom corner of the same square is "Woodgrain"; I cut the square in half diagonally and used the TIEFs then sanded the textured side which was raised. This was tricky to do, I had to remember to have the Textured side UP  as I placed the piece of card into the Folder which had the RAISED section of the folder UP as well. This ensured the raised pattern pushed up through the card and then I could sand off the top colour with Stampin' Sanding System.
[*TIEF = Textured Impressions Embossing Folder]

 This square [above], shows the "Chevron" TIEF impressed onto Gumball Green Core'dinations Paper. the Piece of RED has been squished then sanded, when I was squishing the piece, the layers started to separate so I pulled them apart carefully.

The photo to the RIGHT shows what I did with the piece off the Back, which was the smooth side; I used the Typeset Alphabet Bigz "&" - I folded the piece in half with the smooth sides together, and then moved the bottom piece to the right to create a "shadow" effect.  I thought it needed a little something so I created a "sewing" look by drawing the stitches in the center.

Thanks for taking a peek. I hope I have transferred some creativity to you. Check out the Annual Catalogue on page 157 for the original idea. Stampin' Up! have some great ideas that I'm beginning to take advantage of, and that's the whole idea of having the ideas in their Catalogue. Enjoy your creativity.

Wednesday, 16 May 2012

Double Embossing

Can't believe it is Wednesday again. Here are two cards I made for a class on Double Embossing.
I used So Saffron and Marina Mist CS with a retired DSP-Botanical Gazette from a Past Mini catalogue. The Technique is simple, first, using Versamark, rub over the Embossing Folder, then place the DSP and run through the Big Shot. Add Gold Embossing Powder, heat and there you have it-Double Embossing! you will notice that the images are different, one was done on the positive side of the folder and the other on the negative side...the look is dependent on your personal preference.


Have fun experimenting, come back soon
cheers
Colleen